How I Made This Dreamy DIY Mason Jar Lantern at Home (Easy DIY Under $30)

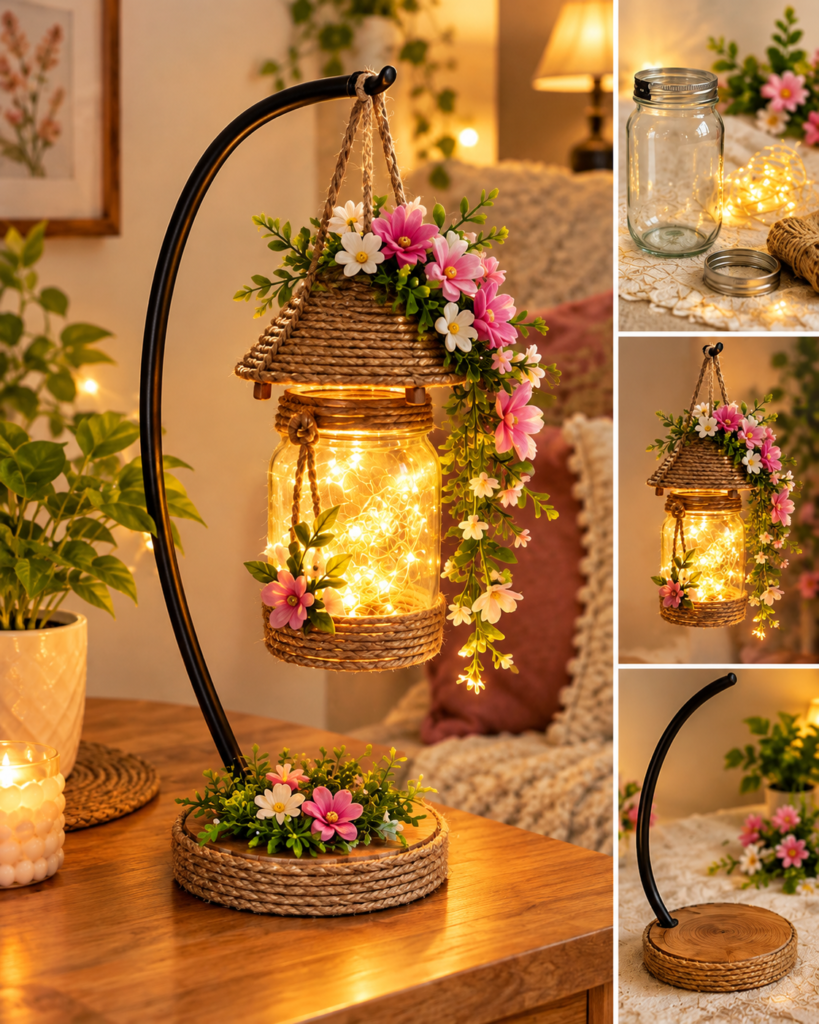
Some decor pieces just make a room feel like a hug. This glowing DIY mason jar lantern is one of them. It hangs from a curved iron stand, sits inside a little jute rope roof covered in blush pink flowers, and fills the whole corner with warm, twinkly light.
The best part? I made it at home with simple supplies, and you do not need to be a “crafty person” to pull it off. If you can use a glue gun, you can make this.
Here is exactly how I did it, with everything I used and how to use each item.
What You Will Need
1. Wide-Mouth Mason Jar (Quart Size)
This is the glowing heart of the lantern. Wide-mouth jars are easier to fill with lights and easier to clean.
👉 AMAZON LINK: Shop Now

16 oz Ball Mason Jars
Perfect for DIY crafts, storage, gifts, and everyday kitchen use.
🛒 Get Yours Now2. Battery-operated copper wire fairy lights (with timer)
Look for warm white lights with at least 20 to 30 feet of wire so the jar looks full and sparkly. Battery packs mean no cords to hide.
👉 AMAZON LINK: Shop Now

✨ Mini Fairy Lights
Add a warm, magical glow to jars, tables, bedrooms, and parties.
Shop This Glow Now3. Natural Jute Twine or Jute Rope
You will use this for the roof, the base, and the hanging straps. Thick rope (around 5 to 6 mm) gives that cozy woven look.
👉 AMAZON LINK: Shop Now

Natural Jute Twine
656ft of rustic jute twine, perfect for DIY crafts, mason jars, gifts, and decor.
🛒 Shop Jute Twine4. Curved Black Metal Plant Hook or Arc Stand
This gives the lantern its fairytale “hanging from a branch” look.
👉 AMAZON LINK: Shop Now

Adjustable Shepherd Hook
Hang lanterns, plants, baskets, and bird feeders beautifully outdoors.
🛒 Shop Now5. Round Wood Slice Base
A natural wood slice works as a sturdy base for the stand. Pick one wide enough to balance the arc.
👉 AMAZON LINK: Shop Now

Adjustable Shepherd Hook
Hang lanterns, plants, baskets, and bird feeders beautifully outdoors
🛒 Shop Now6. Faux Cosmos Flowers (Pink and White)
Silk flower stems are easy to cut and glue. Pink and white together give that soft, romantic cottage look.
👉 AMAZON LINK: Shop Now
7. Faux Greenery Stems or Mini Leaf Garland
This fills in the gaps and makes the flowers look like they are growing naturally.
👉 AMAZON LINK: Shop Now
8. Mini Hot Glue Gun with Glue Sticks
The one tool that holds everything together. A mini one is perfect for tight spots.
👉 AMAZON LINK: Shop Now
9. Thick Cardboard or Foam Board (for the roof)
You can use leftover cardboard from a delivery box. If you want a sturdier roof, foam board works great.
👉 AMAZON LINK: Shop Now
10. Small Wooden Dowels or Craft Sticks (for roof legs)
These lift the roof slightly above the jar so heat and air can flow.
👉 AMAZON LINK: Shop Now
11. Wire Cutters or Strong Scissors
For trimming flower stems and wire.
👉 AMAZON LINK: Shop Now
How to Make It, Step by Step
Step 1: Fill the Jar with Light
Switch the fairy lights on first so you can see how they look. Gently push the wire into the jar a little at a time, swirling it loosely instead of packing it tight. Leave the battery pack outside, tucked at the back near the lid area. Test it, then close the lid if you want, or leave it open if the battery pack needs access.
Step 2: Wrap the Jar Neck and Base with Jute
Put a line of hot glue around the neck of the jar and wrap the jute rope tightly in rows, pressing as you go. Do the same at the bottom of the jar to create that rustic basket look. Make a small knot detail on the front with a loop of jute, just like in the photo.
Step 3: Make the Hanging Straps
Cut three or four long pieces of jute and braid them. Attach one braided strap on each side of the jar neck with glue and extra wrapping. Bring both straps up together and tie them into a loop at the top so the lantern can hang from the hook.
Step 4: Build the Rope Roof
Cut your cardboard into a circle, then cut out a wedge to shape it into a low cone, like a little cottage roof. Glue it into shape. Starting from the outer edge, glue jute rope in a spiral working toward the center until the whole roof is covered. Attach the small dowels underneath as legs so the roof sits just above the jar opening.
Step 5: Decorate with Flowers and Greenery
This is the fun part. Cut your faux flower stems short. Glue the greenery on first, then add the flowers on top, grouped in odd numbers (3 or 5) for a natural look. Let a few stems trail down one side so they cascade over the roof like a little garden. Add a tiny flower and leaf cluster near the jute knot on the jar too.
Step 6: Prepare the Stand
Attach the black arc stand firmly into the wood slice base. If your base needs support, add wood glue or screws. Wrap jute rope around the edge of the wood slice and glue it down in neat rows. Finish with a small bunch of flowers and greenery at the bottom of the stand so it looks styled from every angle.
Step 7: Hang and Style
Hang the lantern from the hook, switch on the lights, and place the whole piece on a console table, nightstand, or side table. Pair it with a candle, a plant, and a cozy throw for that warm evening glow.
“Looking for more ways to transform a small outdoor space? Check out these small balcony decor ideas for an easy weekend makeover.”
Pro Tips
- Warm white lights look far more cozy than cool white.
- Use a timer function so it turns on automatically each evening.
- Keep the lantern away from open flames. Battery lights stay cool, but the jute and flowers can burn.
- Swap the flowers with the seasons: pumpkins and dried leaves for fall, and pine and berries for winter.
Final Thoughts
This little lantern cost me far less than similar decor in stores, and it feels so much more personal. It also makes a gorgeous handmade gift. Once you make one, you will want to make three!
If you try this DIY, tag me or leave a comment below. I would love to see your version.
Disclosure: This post contains affiliate links. If you purchase through them, I may earn a small commission at no extra cost to you. It helps keep The Cozy Finds running. Thank you for your support!
